
Just Sharp enough, and no more!
The Sharpness control is one of the Basic Video Level settings found in every TV. It is also, alas, one of the settings most commonly abused by manufacturers trying to make their TVs stand out in a wall of competing TVs under garish store lighting! Indeed, TV Factory Default settings with Sharpness set WAY too high are commonplace -- a key facet of the justly-infamous Torch Mode settings foisted on new TV buyers. See my prior post on Extinguishing Torch Mode Settings for the others.
Excess Sharpness, in particular, produces the appearance of "false detail" in the image, which looks attractive on a casual glance (applause from the Marketing guys!). However, the REAL details of whatever you are watching are ACTUALLY being obscured!
In this post we'll discuss what the Sharpness adjustment does to your image, and how to set this control properly in your TV -- using a Calibration Disc.
We'll also discuss the problem of "Edge Enhancement"; damage akin to excess Sharpness ALREADY baked into the content you are watching!
The perception of an image as being "sharp" is actually a combination of the resolution of the image, and a characteristic called "acutance" which describes the visible contrast of edges.
Modification of images in an effort to enhance their apparent sharpness dates back to the very early days of photography. There are photochemical tricks which can be applied during film development for example to enhance contrast. There are also tricks which can be applied during the printing process.
One of the most popular of the latter was something called an "unsharp mask". This refers to using a blurred version of the original negative (the "unsharp" bit in all of this), and combining that with an otherwise-normal, positive image of the original. The combo results in "undershoot" and "overshoot" of edges in the image, which the eye perceives as higher contrast on those edges.
Here's an example of an image -- unprocessed in the top half, and with an "unsharp mask" applied in the bottom half:
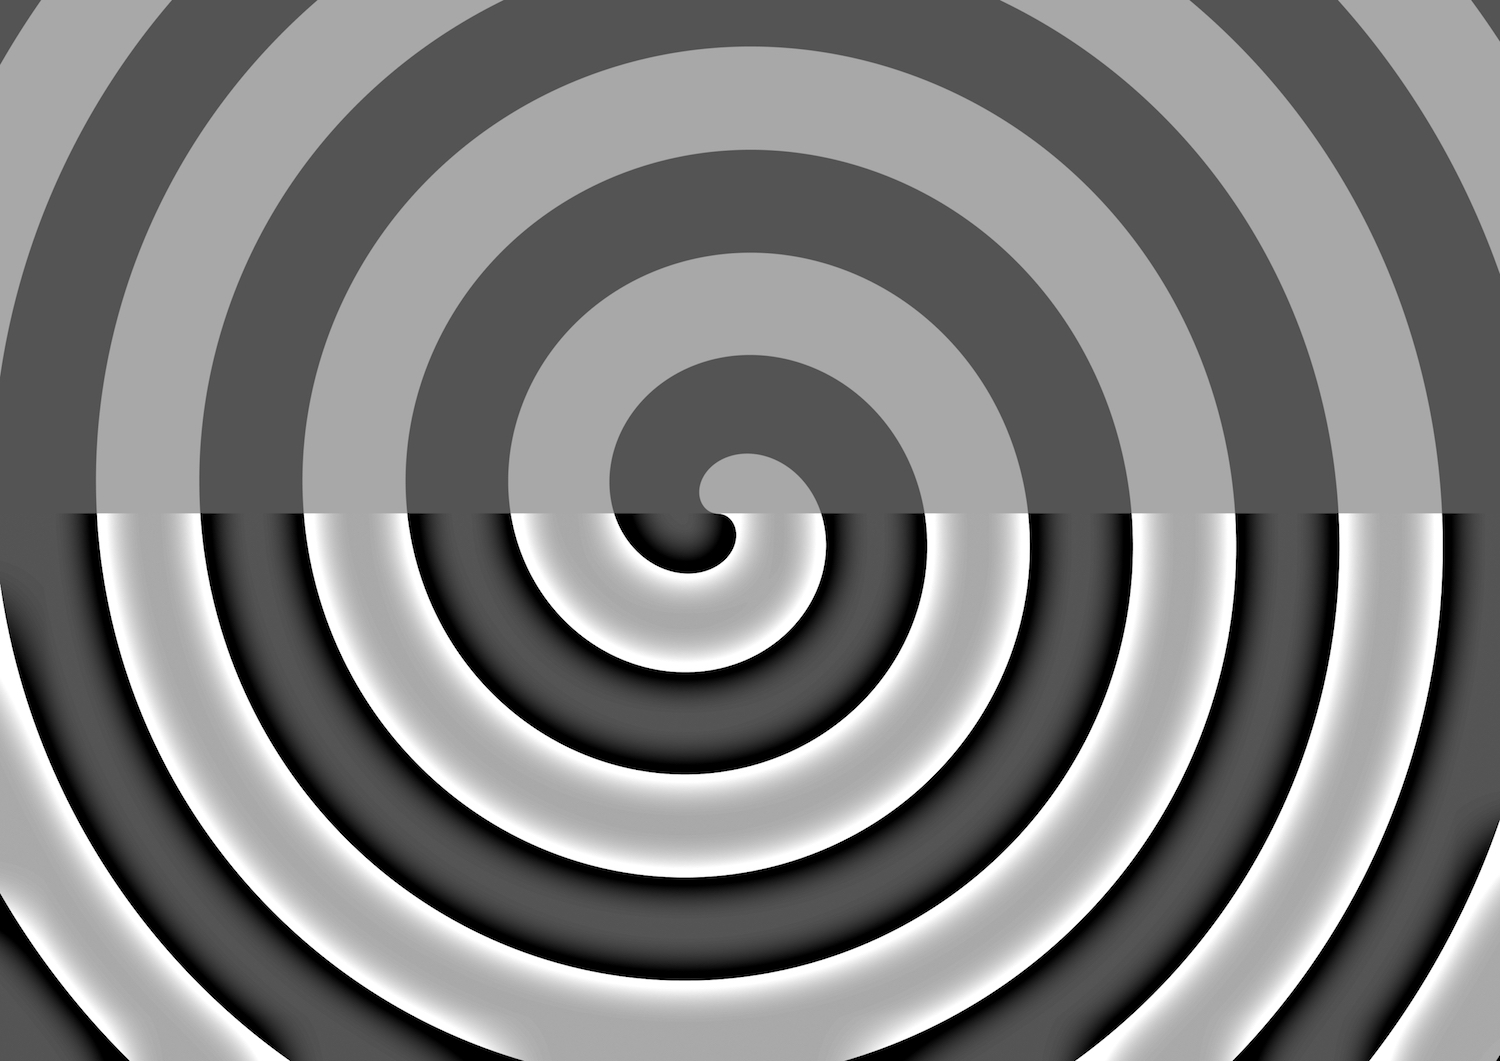
"Unsharp Mask" Applied to Bottom Half
The original image (top half) displays varying degrees of gray. The "overshoot" and "undershoot" from the Unsharp Mask show as the white and black "Haloes", respectively, now appearing on the edges (bottom half).
In Digital Signal Processing, this visible effect -- the "Haloing" -- would be described using the technical term, "Ringing", as when you strike a bell and its sides vibrate (ring) either side of their normal position.
Again, the original "Unsharp Masks" were a physical filter trick -- part of the magic applied to printing the photograph. But the SAME effect can be achieved when processing an image Digitally with particular types of filtering math. And indeed, the "Ringing" / "Haloing" effect comes straight out of that math!
Today there are MANY varieties of Digital image sharpening algorithms, each providing subtly different results. But the math version of the popular, "Unsharp Mask" is always included in such tools, and the "Ringing" of the edges is always a key feature regardless of the tool used.
The Sharpness control in your TV applies just such a filter to the video imagery. Depending on your TV, the Sharpness adjustment may be limited to just vertical edges, or may apply to edges regardless of their direction.
One of the key bits of all this though is the effect is, pretty much, ONLY seen in "edges". This was important, particularly in the early days of TV, because you didn't want this adjustment to amplify "film grain" or "noise" scattered throughout the image.
(On the downside, sharpening JUST the edges produces a disconnect between the processed appearance of the portions of the image with lots of edges, and the portions which have a more flat, edge-free appearance.)
Sharpness processing could thus be applied to poorer quality imagery, and yield attractive results -- PARTICULARLY on the smaller TV screens of the day!
And indeed, the Studios soon started wondering, "Why wait for the TV to do it?"
That is, why not PRODUCE content with edges already processed in this fashion?
If you've read my post on Art From the School of Shoddy, you've likely already spotted this as a classic example of Shoddy Logic! I.e., let's screw up our product to "optimize" it for smaller, poorer quality, TVs and for less discerning viewers!
And sure enough, Home Media content with pre-applied, "Edge Enhancement" soon started appearing. Everywhere! Now understand, once such filtering has been applied to the imagery, there's NO WAY to back it out again. The damage has already been done. The information in the original imagery has been lost. Permanently.
The pushback was both quick and intense. Folks with better quality viewing setups -- particularly projector owners with their very large screens -- started screaming about releases which were just chockablock with excessive Edge Enhancement. Lists of such Shoddy releases soon started appearing.
Alas, even today you'll find Studios releasing Home Media content with Edge Enhancement applied. However, at least they are now conflicted about it!
From the point of view of setting up your Home Theater, the above simply means you shouldn't rely on real movie or show content when adjusting your Sharpness setting. You need to use content of "known correctness". Which means using a Calibration Disc.
Most any Home Theater calibration disc you get will include a decent test chart for adjusting the Sharpness control. Since I used, "Spears & Munsil, 2nd Edition", Blu-ray, as my example disc in the post just linked, I'll talk about their Sharpness chart and how to use it here.
Before adjusting Sharpness, it is wise to get some preliminaries out of the way first.
For example, pick the correct "Picture Mode" in your TV, since undesirable Picture Modes (e.g., with names like "Vivid", "Dynamic", or "Scorch Your Eyeballs") will typically have ADDITIONAL processing related to Sharpness hidden under the covers. I.e., in hidden settings you CAN NOT BACK OUT. So start with the correct Picture Mode for critical viewing of high quality content. See my post on Extinguishing Torch Mode Settings for guidance on finding the right one.
Next, make sure you have adjusted the image "geometry" settings in the TV so that you are seeing ALL the pixels in the test chart -- out to all 4 edges, with no cropping or overscan. This is to eliminate scaling artifacts which will alter the apparent crispness of the image. See my post on Adjusting Image Geometry for details.
Next, adjust the Black and White levels of the image (Brightness and Contrast controls, respectively). Home Media content has more resolution in gray scale than it does in color, and so the test charts for Sharpness are black and white imagery. You'll want to know your TV is set to render such gray scale images properly, so you have the best chance of seeing what your TV really can do as regards Sharpness. See my two posts on Blacker Than Black Video, and Peak Whites Video, for guidance.
With those preliminaries out of the way, bring up the Sharpness test chart from your calibration disc. For "Spears & Munsil, 2nd Edition", Blu-ray, you can navigate to that chart as follows:
- From the initial menu screen, select Advanced Video in the left hand column
- Select Setup from the tabs that appear across the top
- Select Sharpness from the middle of the 2nd column of charts appearing below
The chart will fill the screen as a gray background with white and black lines overlaid. Towards the edges, there are four rectangles of thin white lines surrounding the image. You should be able to see the white line of the outermost of those four, along all four edges of your screen. If not, revisit your image "geometry" settings as described above.
There are also black lines along the diagonals, a black circle towards the middle of the image, and a cross-hatch inside that circle of black lines -- thinnest lines towards the upper left of that grouping of lines and thickest lines towards the lower right of that grouping.
Now bring up the Sharpness control in the picture settings for your TV. If this is the first time you've adjusted Sharpness since you got the TV, the control is likely set in the upper half of its range. This is its Torch Mode setting!
TECHNICAL NOTE: Depending on your TV, you may have SEPARATE controls for Horizontal and Vertical Sharpness adjustment. Adjust BOTH of these as described below. And remember you will eventually need to copy the correct Sharpness setting into the picture adjustment settings for the OTHER Inputs of your TV, as most TVs these days remember such settings "per Input", and often also "per type of content being played" on a given Input.
The CORRECT setting for Sharpness is likely to be WAY lower than that. Indeed the correct setting in many TVs is to drop Sharpness ALL the way DOWN -- i.e., apply NO Sharpness addition. But we'll get to that in a moment.
The FIRST thing for you to do is crank Sharpness all the way UP! (If you have two controls do that for both of them.)
Now go up to the screen and look at those black lines. The cross-hatch of thinner and thicker lines inside the middle circle is a good place to start, but look at the circle and the diagonal black lines as well so you get familiar with what you are seeing.
What you are LOOKING for is the telltale Haloing of those black lines because of too much Sharpness addition. That is, look for the Ringing appearance of white/black borders found immediately to either side of those lines. See the picture of the "Unsharp Mask" above for an example. Spend a moment marveling at what the Sharpness image processing has wrought! Focus on what the Haloes look like on the edges of those black lines.
Get familiar with them. Make them part of your mental catalog of undesirable image artifacts. Now, GET RID OF THEM!
TECHNICAL NOTE: If your TV only has one Sharpness control, it is possible you will only see the Haloes either side of the Vertical black lines. This simply means your TV is only applying Vertical Edge Enhancement. Most modern TVs, however, will show the Haloes either side of both the Horizontal and Vertical lines, as well as around the circle, and on the diagonals.
As said, that Haloing is precisely what you want to GET RID OF! So lower Sharpness until there is absolutely no sign of Haloing left on any of those edges. Be sure to check Horizontal, Vertical, Circle, and Diagonal edges as the Sharpness setting may need to be lowered a bit more to clear the Haloes from ALL of those.
Do not be alarmed if you find you need to lower Sharpness ALL the way to fully eliminate the Haloes.
Once you think you have found the Sharpness setting which fully -- and I do mean FULLY -- eliminates every speck of the Haloes, note that setting and then lower Sharpness ALL the way.
TECHNICAL NOTE: In some TVs the lowest settings for Sharpness will actually "blur" the image -- the line edges on this chart will start to get fuzzy. In other TVs, there will be no blurring at all even at the lowest Sharpness setting.
If you see "blurring" of the edges as just described, RAISE the Sharpness setting until that blurring is gone. Be sure you do *NOT* raise Sharpness so much that the Haloes start to reappear. (It is more important to completely eliminate the Haloes.)
Assuming there is a range of Sharpness settings which exhibit both no blur and no Haloes, slowly raise Sharpness some more until you start to see the Haloes reappearing. Is that a different setting than you picked above when lowering Sharpness?
Go back and forth a few times -- approaching the setting from either side -- until you are confident you have found the Sharpness setting which is one step BELOW where the Haloes BEGIN to appear.
Compare that to the (hopefully) lower setting where blurring starts to appear. You can safely set Sharpness anywhere in that range -- ABOVE the point blurring starts to appear and BELOW the point Haloes start to appear. (If forced to choose, give precedence to eliminating the Haloes.) You'll get varying recommendations whether the "best" Sharpness setting is at the low or high end of that range, but in reality it likely makes little or no difference.
And that's it!
Now, as stated above, even with Sharpness adjusted PROPERLY, you may still see signs of Haloing in some of the content you watch. This simply means that content has undesirable "Edge Enhancement" already baked in!
If you have a larger screen -- for example with a projector -- you are far more likely to notice such nonsense in different things you watch.
The most important advice at this point is, TRUST THE SHARPNESS ADJUSTMENT YOU MADE ABOVE!
Do NOT try lowering Sharpness further -- perhaps into the blurring range -- in an effort to fix this problem in the content. It can't be fixed.
So live with it, grit your teeth, set your shoulders, jot down the name of the Studio and the names of the filmmakers involved, and determine to never buy content from the School of Shoddy, ever again!
--Bob